Custom Window Decals for Medical and Dental Clinics
Couldn't load pickup availability
Need help, a custom request, or a specific budget in mind? Email us, we’ll go above and beyond to make it work for you. hello@printdrill.com

Customer Product Photos ✌︎㋡
(Proof of Work)
Custom Window Decals for Medical and Dental Clinics
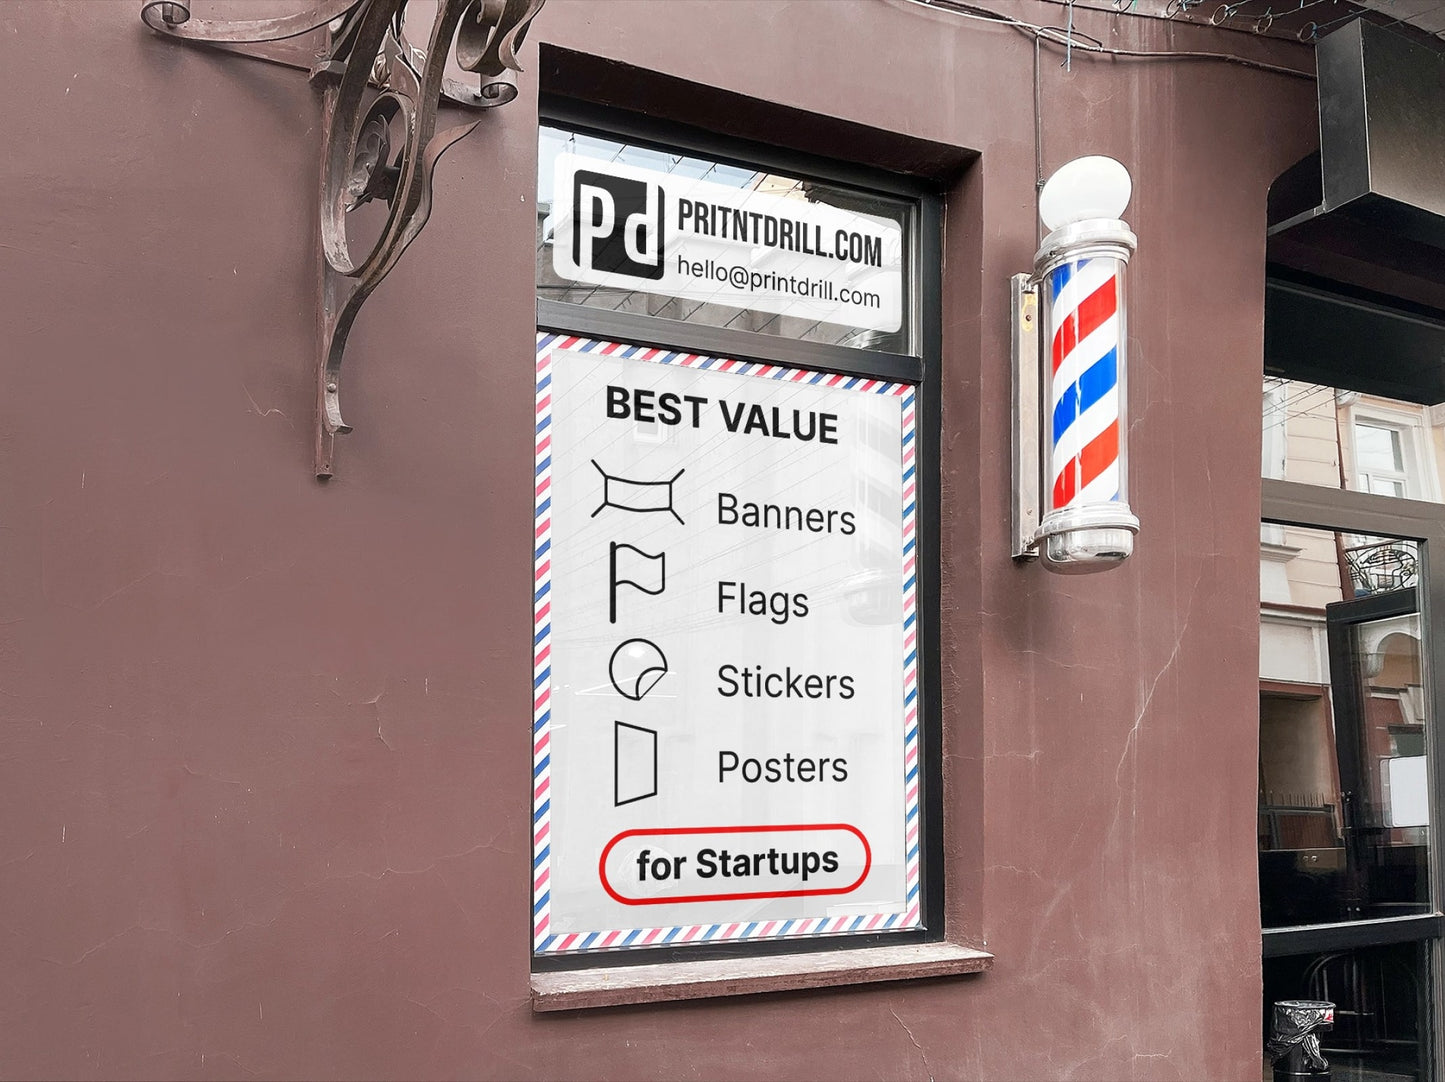
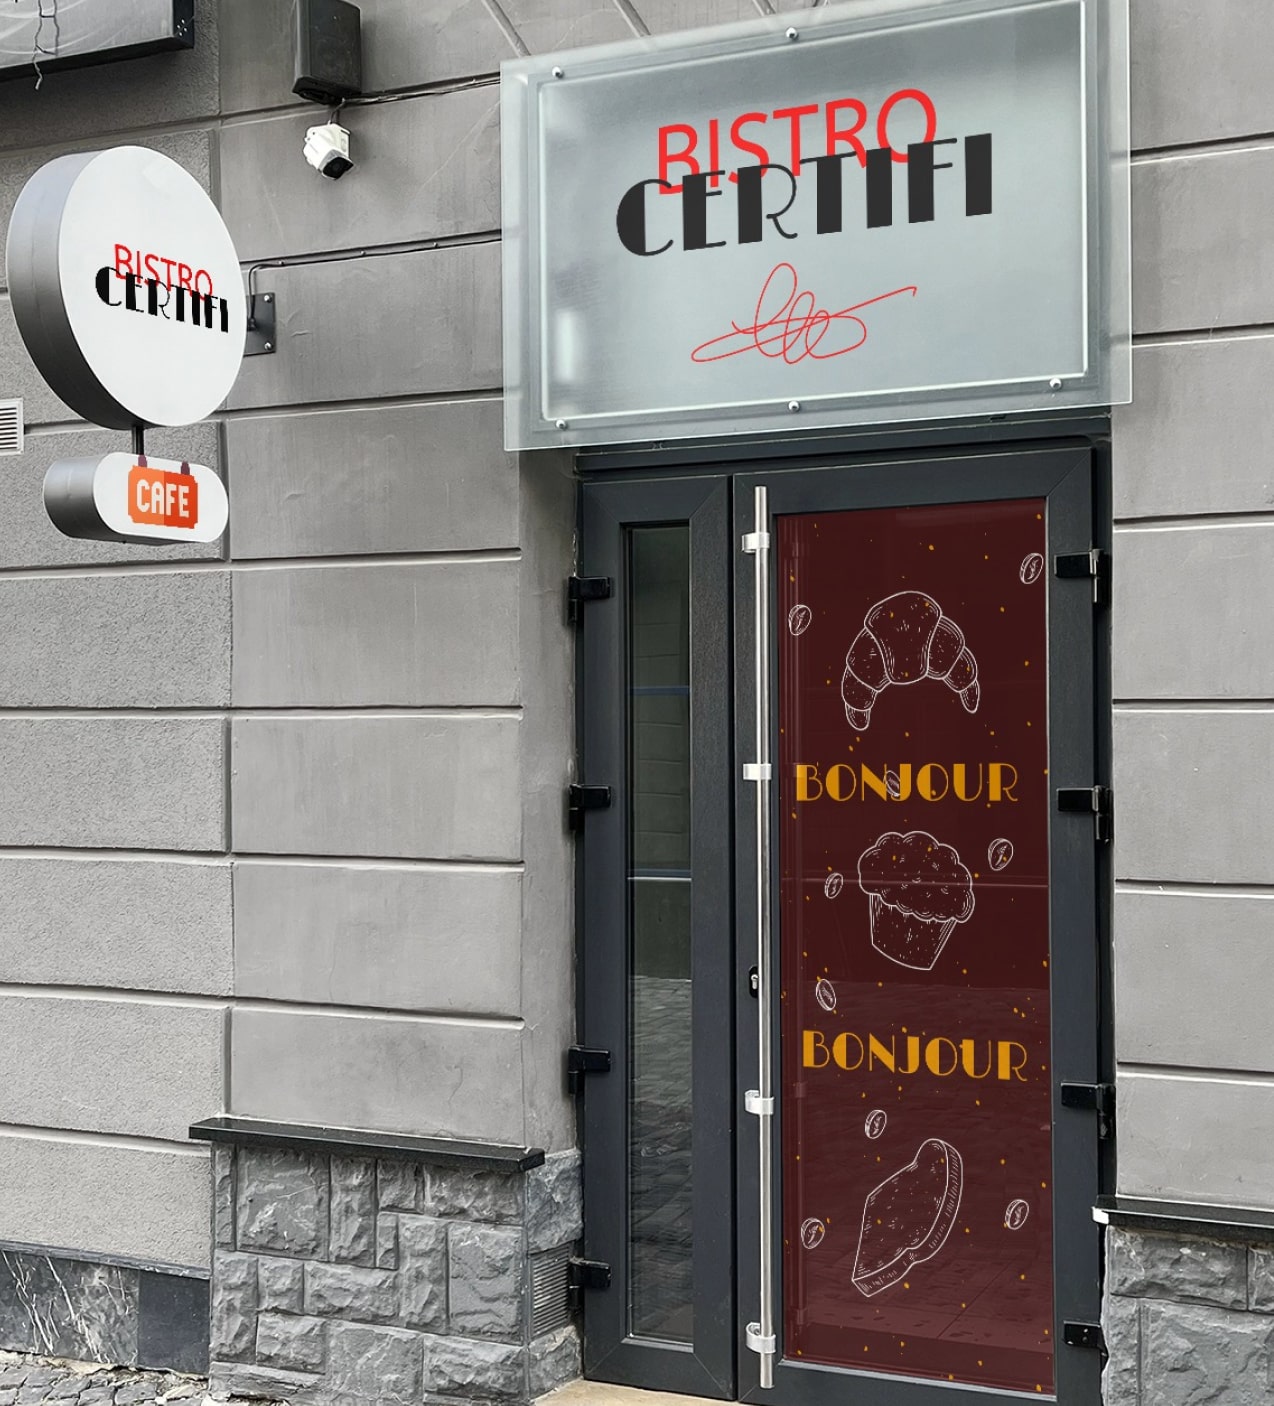
Custom Window Decals designed for medical and dental clinics are adhesive graphics for glass and smooth surfaces that help clinics communicate hours, services, wayfinding, privacy notices, and branding. Ideal for reception windows, exam room glass, and exterior entrances, these decals make professional clinic signage visible and consistent with your brand identity. They help manage patient flow, increase brand recognition, and improve privacy without altering your fixtures. Available in custom sizes and shapes to fit doors, windows, and glass partitions used by doctors’ offices and dental practices.
Looking for general-purpose Window Decal?
If you’re evaluating options, it’s worth exploring our standard options of Custom Window Decals. View our main Custom Window Decals page here.
Page title
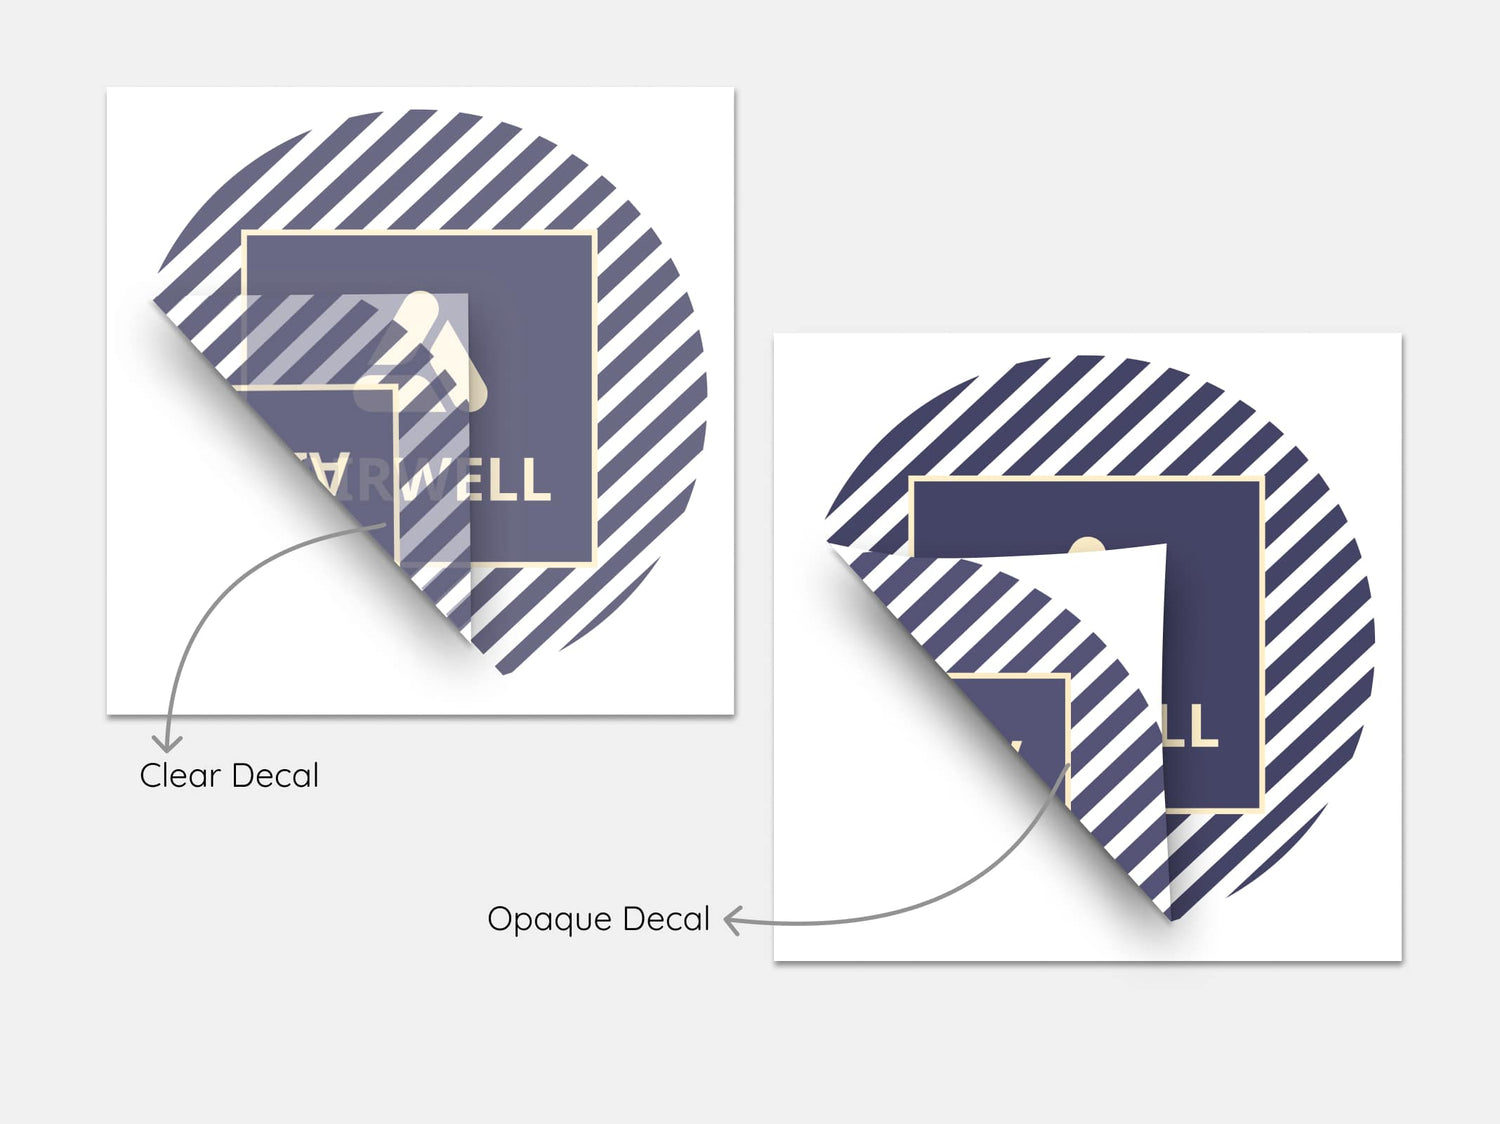
Clear Decals vs. Opaque Decals: Choose the Right Fit for Your Window Display
Clear Decals: Perfect for a seamless look, clear decals allow light and visibility through the design. They’re excellent for storefront branding where you want to showcase graphics without fully blocking the view. Use these for storefront logos, product promotions, or decorative elements.
- Transparent Background: See-through areas around your design.
- Bright Colors with White Ink Options: Choose full or partial white ink for added vibrancy.
- Indoor & Outdoor Use: Withstands various weather conditions.
- Ideal For: Brand logos, hours of operation, or product displays on glass doors and windows.
Opaque Decals: For bold, standout designs, opaque decals provide full coverage with no transparency. These decals are ideal for fully covering areas with vibrant, visible graphics that stand out in any light. They’re suitable for advertising, branding, and privacy on windows or glass partitions.
- No Transparency: Full-color graphics with no see-through.
- Glossy & Matte Finishes: Choose a sleek gloss or refined matte.
- Weather-Resistant & Durable: Long-lasting against sunlight and weather.
- Ideal For: Strong brand promotions, logos, or messages where full privacy or high visibility is needed.
Key Differences:
- Transparency: Clear decals are semi-transparent, while opaque decals provide full coverage.
- Application: Clear decals are ideal for subtle branding; opaque decals offer bold visibility.
- Finish: Clear decals come in transparent finishes; opaque decals offer gloss or matte.
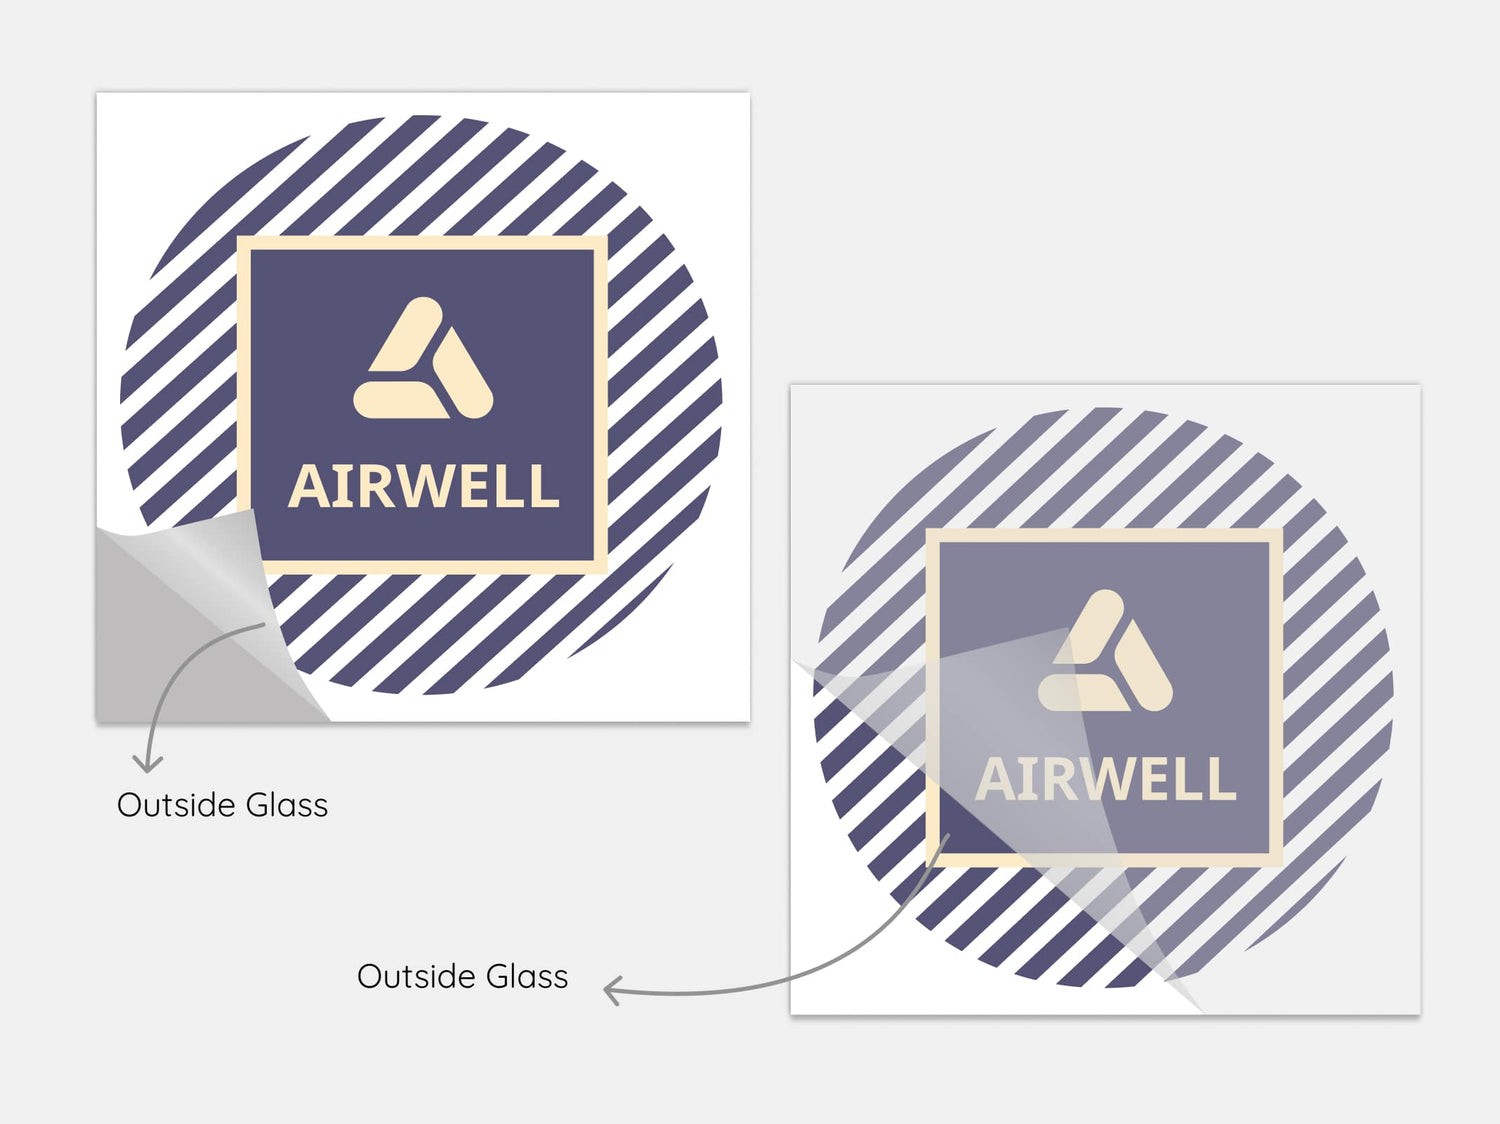
Inside Glass vs. Outside Glass Application: Choosing the Right Window Decal Placement
Inside Glass Application: This option allows decals to be placed on the interior side of the window, facing outward. It’s ideal for businesses looking to protect their decals from external elements like rain, wind, and UV exposure, enhancing their longevity. Inside glass application is commonly used in storefronts or businesses in high-traffic areas, providing a clean look from outside while keeping the decal protected.
- Enhanced Durability: Protects decals from weather, scratches, and vandalism.
- Ideal for Clear and Opaque Decals: Both options look crisp and vibrant when viewed from outside.
- Perfect for Storefronts & Indoor Spaces: Great for stores wanting to display branding without direct exposure.
Outside Glass Application: For quick and impactful visibility, outside glass application involves placing decals on the exterior of the glass. This option is perfect for highly visible, easy-to-install signage that directly catches the attention of foot traffic or passersby. Ideal for seasonal promotions, sales announcements, or temporary signage, outside glass applications maximize visibility and accessibility.
- Maximum Visibility: Directly captures attention with clear, high-quality prints.
- Easy Installation and Removal: Simple to apply or change as needed.
- Ideal for Temporary or Short-Term Use: Excellent for promotions, events, or messages needing high visibility.
Choosing the Right Option:
- Inside Glass: Best for long-term displays where protection is a priority.
- Outside Glass: Ideal for short-term or seasonal graphics needing high exposure.
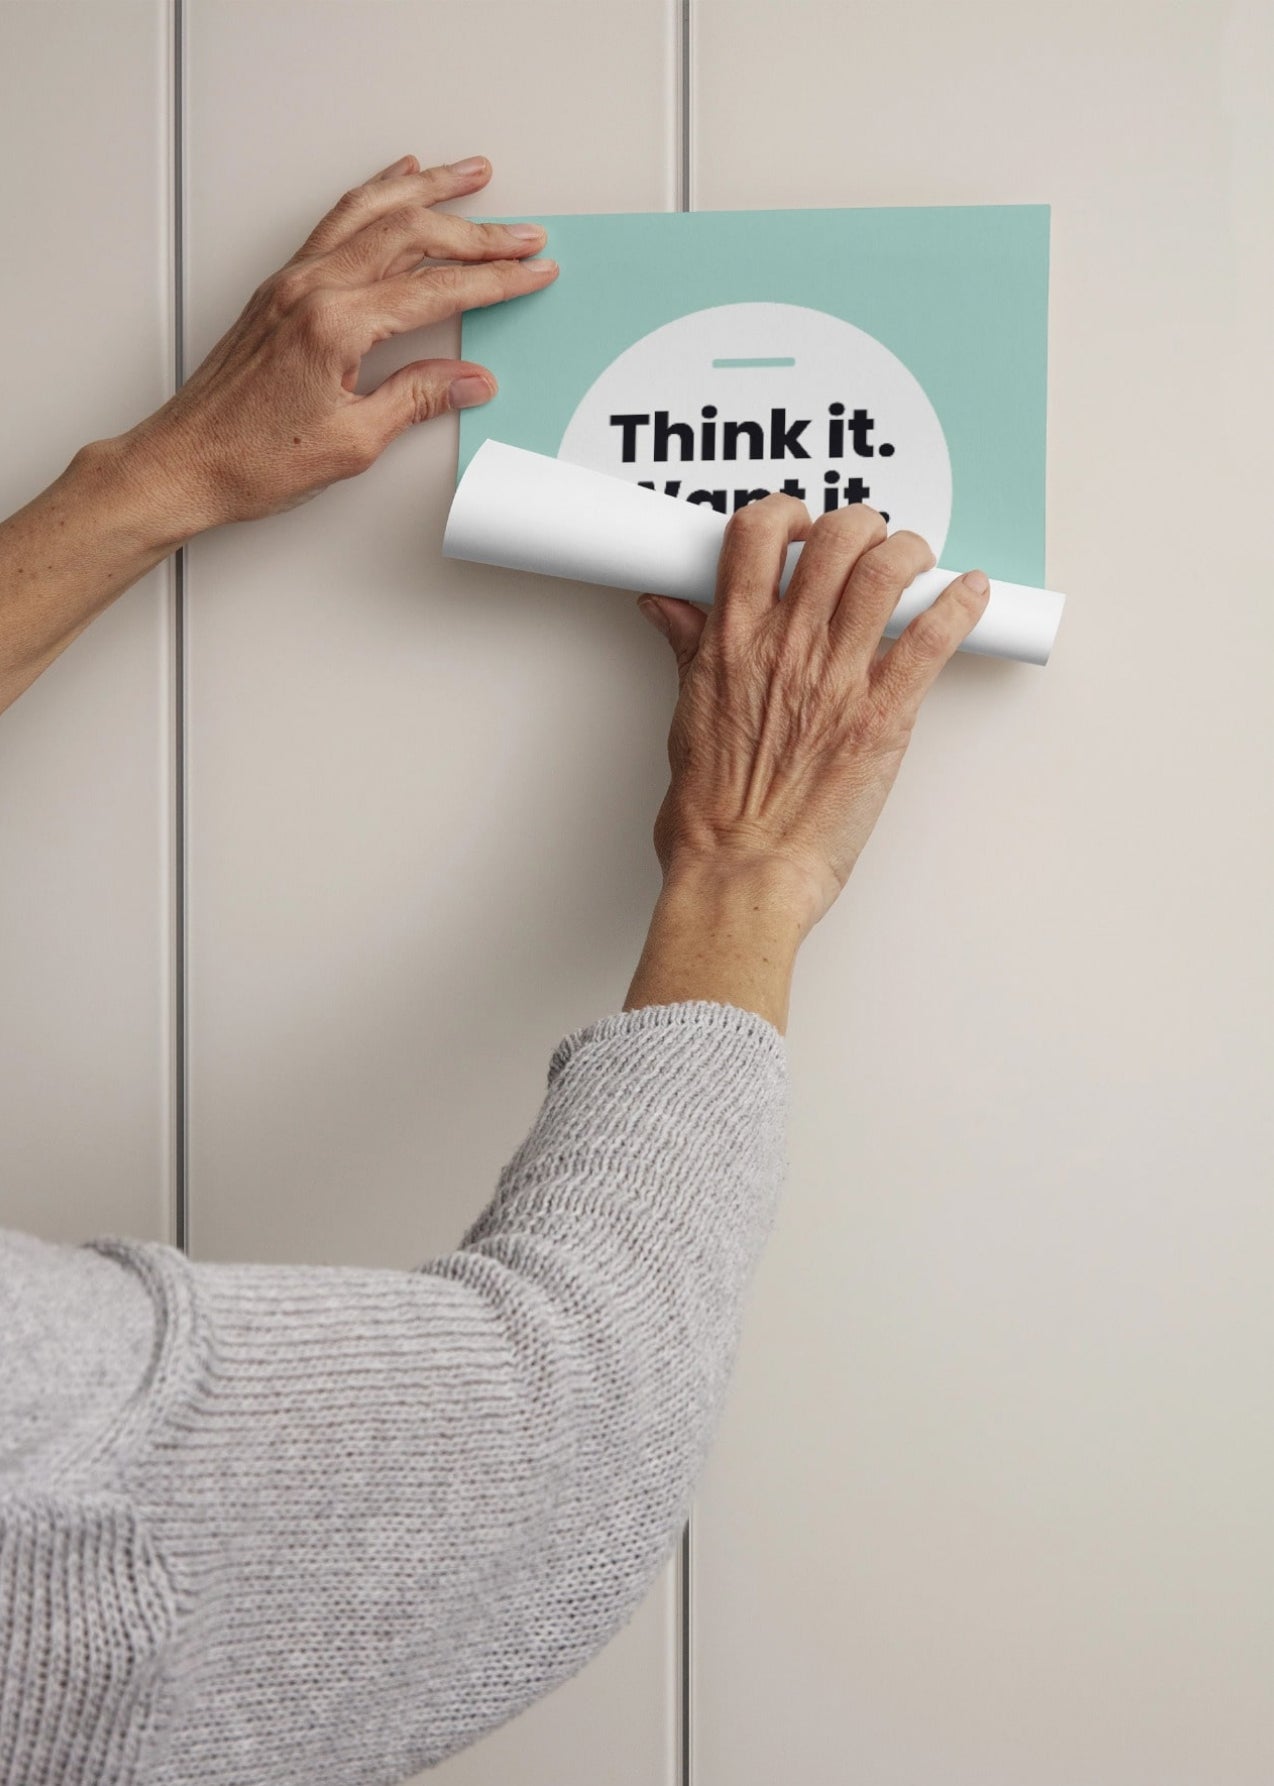
How to Apply a Decal on a Surface – Step-by-Step Guide
Applying a decal might seem tricky at first, but with the right tools and steps, you can achieve a smooth, bubble-free finish. Here's a detailed guide to help you apply your decal correctly on surfaces like glass, metal, plastic, or walls.
Materials You’ll Need:
- Decal with transfer tape
- Cleaning solution (mild soap and water or isopropyl alcohol)
- Lint-free cloth or paper towels
- Masking tape
- Squeegee or credit card
- Scissors (optional)
Patience and a clean, dry workspace
Step 1: Clean the Surface - Start by thoroughly cleaning the area where you’ll apply the decal. Use a mild soap and water mixture or isopropyl alcohol to remove dust, dirt, oil, or wax. Wipe it dry with a lint-free cloth. A clean surface ensures strong adhesion and a smooth finish.
Step 2: Position the Decal - Without removing the backing, place the decal on your surface and adjust its position until it's exactly where you want it. Use masking tape to hold the top edge of the decal in place. This acts as a hinge and keeps your decal aligned.
Step 3: Peel the Backing Paper - Lift the decal upward while it's still taped at the top, and begin slowly peeling away the backing paper. The decal should remain stuck to the clear transfer tape. If parts of the decal stick to the backing, press them back down and try again gently.
Step 4: Apply the Decal - While holding the decal up by the transfer tape, start applying it from top to bottom. Use a squeegee or a credit card to press the decal onto the surface. Start in the center and work your way outward to eliminate bubbles and creases.
Step 5: Smooth and Secure - Once the entire decal is applied, go over it again with the squeegee to ensure all areas have adhered properly. Pay extra attention to edges and corners.
Step 6: Remove the Transfer Tape - Slowly peel back the transfer tape at a 45-degree angle. If any part of the decal lifts with the tape, press it down with the squeegee and peel again carefully. Continue until the tape is fully removed.
Step 7: Final Touches - Inspect the decal for air bubbles. Small bubbles can be popped with a pin and smoothed out with a squeegee. Let the decal cure for 24-48 hours for maximum adhesion, especially in outdoor conditions.
Collapsible content
Product Specifications
Common Specifications
- Application Options: Inside Glass or Outside Glass
- Adhesion Type: Semi-permanent, removable vinyl
- Color Options: Clear or White (Opaque)
- Printing Quality: Full Color, 600 DPI UV Printing
- Custom Sizes: Available
- Included Accessories: Free squeegee for easy application
- Durability: Weather-resistant, waterproof
Specifications by Decal Type
1. Opaque Decals
- Material: White Vinyl (Opaque)
- Film Type: 100 Micron White Monomeric Vinyl
- Material Thickness: 250 microns
- Graphic Weight: 130 GSM
- Finish Options: Glossy or Matte (with UV print for matte option)
- Color: White Gloss Front/Back
- Lifespan: 5+ years with proper care
- Size Variance: +/- 3mm
- Special Feature: Full-color, vibrant printing ideal for clear visibility on non-transparent surfaces
2. Clear Decals
- Material: Clear Vinyl
- Film Type: Gloss Optical Ultra Clear Transparent Monomeric Vinyl
- Material Thickness: 120 microns
- Graphic Weight: 130 GSM
- Ink Options: Partial White Ink or Full White Ink for enhanced visibility and color vibrancy
- Transparency: Allows see-through visibility, with transparent background
- Lifespan: Up to 3 years with proper care
- Size Variance: +/- 3mm
- Special Feature: Ideal for maintaining natural light flow and partial window transparency
3. Die-Cut Decals
- Material: Available in both Clear and White Vinyl options
- Cut Style: Custom shape cutting to match design or logo outline, includes options for square, rectangular, circular, or custom shapes with borders
- Material Thickness: Varies by material selection (120 microns for clear, 250 microns for opaque)
- Application: Inside or Outside Glass
- Special Feature: Allows for unique shape customization, enhancing brand visibility with standout, sticker-like appearance
Additional Notes
- Shelf-life (Unapplied Decals): 6 months for both clear and opaque options
- Maximum Size: For decals exceeding 58.5 inches in width or height, the product will be shipped in multiple pieces.
- Usage: Recommended for smooth surfaces such as glass, metal, high-quality plastic, sealed wood, and painted walls to ensure optimal adhesion.
How to Order?
Explore the most convenient way to order Signage and Print products online.
Step 1: Customize Your Product
Choose from material types, sizes, finishing options, and extras like lamination. Unsure? Our pre-selected options work for most needs, but feel free to adjust based on your preferences.
Step 2: Graphic Design Options
Upload your own design, use our templates, or let our designers create something for you based on your instructions.
Step 3: Upload Files Later (Optional)
If your design isn't ready, no worries! You can place your order now and upload the design later.
Step 4: Proofing & Approval
We provide free proofing to ensure everything looks perfect. You'll approve the final proof before production starts.
Question & Answers
FAQs for Custom Window Decals for Medical and Dental Clinics
Q: Can I use these decals on exterior clinic windows and doors?
A: Decals are designed for application to glass and smooth surfaces commonly used at clinic entrances and interior areas. For exterior use, consider placement on protected entrances and review product suitability for outdoor exposure or consult our product details if you require options for sustained exterior conditions.
Q: Will the decals help with patient privacy in exam rooms?
A: Decals can reduce visibility into clinical areas when applied to glass partitions or doors, making them useful as patient privacy stickers. They are a visual tool to limit sightlines but should be used in conjunction with broader privacy practices and facility policies.
Q: Can decals be sized to fit irregular window shapes at a clinic?
A: Custom sizing and shape options let you tailor decals to match doors, storefront windows, and interior glass panels. Providing accurate dimensions and placement photos helps ensure a proper fit.
Q: Are these suitable for dental office glass decals on treatment-room partitions?
A: Yes. Dental practices commonly use glass decals for branding, privacy, and wayfinding on interior partitions and windows. Choose sizes and designs appropriate to the visibility and privacy needs of treatment areas.
Q: How do I prepare the glass before applying a decal?
A: Clean the glass to remove dust, oil, and residues. A mild, non-abrasive cleaner and lint-free cloth are typically adequate. Ensure the surface is dry before application to help the decal adhere smoothly.
Q: Can I include my logo and full-color branding on the decal?
A: Custom decals accommodate clinic branding elements such as logos and colors. Provide high-resolution artwork and specify any color or layout preferences when placing your order.
Q: Will decals damage the glass or paint when removed?
A: Decals are applied to glass and smooth surfaces. Removal ease can vary depending on surface condition and length of time applied. If removal without residue is a priority, discuss options and removal guidance with the production team to select the best approach for your surface.
Q: Can I use decals to display temporary messages, such as holiday hours or service changes?
A: Decals are commonly used for temporary messaging and promotions on clinic windows and doors. For frequently changing messages, consider smaller removable decals or planning removable options to avoid repeated long-term adhesion on the same area.
Q: How do decals perform near high-traffic reception areas?
A: When properly applied to a clean glass surface, decals provide a neat and visible way to display information in reception zones. Avoid placing decals where they will be repeatedly scraped or abraded to maintain appearance.
Q: Are there design guidelines for legibility from outside the clinic?
A: Use large, high-contrast text and simple layouts for messages intended to be read from a distance. Consider typical approach distances and lighting when selecting font sizes and colors for front-door or storefront signage.
Q: Can I use window decals for multi-location healthcare branding?
A: Yes. Coordinated decal artwork and consistent messaging help maintain a uniform, professional appearance across multiple clinics. Provide consistent artwork files and size specifications for repeatable results.
Q: Do decals require special cleaning products in a medical environment?
A: Routine cleaning with mild, non-abrasive cleaners is generally appropriate. Avoid harsh or abrasive chemicals that could affect the decal surface. Confirm any specific cleaning recommendations included with your order for best results.
Collapsible content
More info on Custom Window Decals for Medical and Dental Clinics
What these decals are
Custom Window Decals are printed adhesive graphics intended for application to glass and other smooth, non-porous surfaces commonly found in medical and dental clinics. They provide a straightforward way to add professional clinic signage, healthcare branding, patient privacy stickers, and clear, legible information for visitors and staff.
Key benefits for medical and dental clinics
- Clear patient communication: Use medical clinic window signs to display hours, directions, check-in instructions, or mask policies so patients know what to expect before entering.
- Professional branding: High-impact dental office glass decals reinforce your practice’s identity at the point of arrival, improving perceived professionalism and trust.
- Improved privacy: Patient privacy stickers on exam room glass or waiting-area partitions help reduce visibility into clinical spaces and support discreet operations.
- Wayfinding and workflow: Decals for doors, windows, and glass panels help direct patient flow and reduce confusion during busy periods, saving staff time.
- Custom-fit for any window: Custom sizes and shapes allow precise fit around doors, storefront windows, and interior glass, ensuring a neat, tailored appearance for doctors’ office window ads and signage.
- Consistent messaging: Applying coordinated healthcare branding across multiple decals provides a uniform look across entrances, reception areas, and treatment rooms.
- Low-profile installation: Decals avoid permanent construction changes while delivering professional clinic signage where it’s needed most.
Why these work well for medical and dental clinics
Glass is a prominent surface in modern clinics—entrances, exterior windows, interior partitions, and doors are all highly visible. Custom window decals are a practical, non-structural way to place important information and brand elements exactly where patients look first. They are particularly effective in healthcare environments because they can be sized and shaped to match windows and doors, provide legible messaging at entry points, and help control sightlines for privacy in waiting and clinical areas.
Ideal real-world use cases
Examples of how medical and dental clinics commonly use window decals:
- Front door and storefront decals: Display your practice name, logo, hours, and contact information as visitors arrive.
- Reception window signs: Show check-in procedures, mask requirements, or patient arrival instructions where they’re most visible.
- Exam room privacy decals: Apply subtle graphics or frosted-effect designs on glass partitions to limit sightlines between clinical spaces.
- Directional signage: Use decals on interior glass to mark restrooms, lab areas, and clinician offices to streamline visitor movement.
- Promotional and seasonal messaging: Temporary messages for new services, notice of closures, or public health reminders posted on glass without permanent modifications.
- Sterile zone reminders: Mark boundaries or entry requirements for restricted clinical areas.
Customization and branding options
Customization allows clinics to align window graphics with their visual identity and practical needs. Options typically include custom sizes and shapes to match specific window areas, full-color graphics for logos and imagery, and text layouts for hours and instructions. These choices let you size a decal to fit entry doors, create patterned privacy graphics for glass partitions, or design small informational stickers for check-in windows. When planning decals for a multi-location practice, consistent artwork and messaging help maintain a uniform patient experience across sites.
Installation and care (typical guidance)
To ensure the best appearance, start with a clean, dry glass surface free from dust, oils, and residues. For a smooth application, lift and position the decal, then smooth from the center outward to reduce air bubbles. Avoid applying to damaged or heavily textured glass. Routine cleaning with a mild, non-abrasive cleaner will help keep decals legible and presentable; follow any specific care recommendations provided with your order.
Environmental and usage conditions
These decals are intended for use on interior and entrance glass in clinic environments. Typical placement includes exterior doors, lobby windows, and interior glass partitions. For areas that experience direct outdoor exposure, consider placement on protected entrances or consult product details for options suited to exterior conditions. Avoid applying decals to surfaces exposed to excessive moisture, heavy abrasion, or extreme temperatures without checking product suitability for those conditions.
Regulatory and privacy considerations
Window decals can support privacy goals by reducing sightlines into clinical spaces, but they are one part of an overall privacy strategy. Follow local regulations and professional guidance regarding patient privacy and signage, and coordinate decal messaging with clinic policies and legal requirements where applicable.
Design tips for clinics
- Use clear, readable typefaces at sizes large enough to read from typical approach distances.
- Keep critical information concise—hours, contact, and simple instructions are most effective above the fold of a door or window.
- Choose high-contrast colors for legibility against varying light conditions through glass.
- For privacy graphics, consider repeating patterns or subtle opacity to maintain a professional look while reducing visibility.
Buying confidence and practical value
Choosing custom window decals for your medical or dental clinic delivers immediate visual improvements to entrances, reception areas, and clinical partitions without structural changes. They support patient communication, enhance healthcare branding, and help manage privacy in visible spaces. When you order custom decals sized and designed for your windows, you get a practical, repeatable solution that integrates into your clinic’s workflow and image. For any specific application concerns—exterior exposure, frequent message changes, or removal considerations—discuss your needs with the production team so the decals match your operational requirements and visual standards.
Looking for our standard options? View our main Custom Window Decals page here.