
What Is a Banner Stand Kit? Guide for Event Planners
TL;DR:
- A banner stand kit is a complete portable display system including a stand, graphic, support pole, case, and hardware. It is used at trade shows and events to create a professional branded display and varies based on venue, graphic material, and quality level. Proper setup and investment in durable, high-quality kits extend lifespan and ensure consistent, effective branding.
A banner stand kit is a complete portable display package that includes a stand frame, a printed graphic, and the accessories needed to create a professional promotional display at trade shows, exhibitions, and events. Event planners and marketing professionals rely on these kits because they combine portability with a polished, branded appearance. The industry term for the most popular format is the retractable banner stand, though the broader category covers several frame types. Understanding what is a banner stand kit means knowing all three components: the hardware, the graphic, and the support accessories that keep everything running smoothly across multiple events.
What is a banner stand kit and what does it include?
A banner stand kit is defined as a bundled display system that gives you everything needed to present a branded graphic without sourcing parts separately. Banner stands are reliable and adaptable marketing tools used across trade shows, retail environments, and live events. That adaptability is exactly why kits sell better than standalone hardware.
Most kits include these core components:
- Stand frame. The structural base that holds the graphic upright. Frame types include retractable (roll-up), telescopic, X-frame, and outdoor weighted bases.
- Printed graphic. Either vinyl or fabric, sized to fit the specific frame. The graphic is the visual centerpiece of the display.
- Support pole or brace. A telescoping or fixed rod that connects the base to the top of the graphic and keeps tension consistent.
- Carrying case. A padded bag or tube that protects the stand and graphic during transport and storage.
- Clips or attachment hardware. Small fasteners that secure the graphic to the pole or base, depending on the frame design.
Graphic material choice matters more than most buyers expect. Vinyl is vibrant and reflective, making it strong for bold color graphics. Fabric has a matte finish with less glare, which works better for text-heavy designs or well-lit conference rooms. The right material depends on your venue lighting and the complexity of your artwork.
Pro Tip: Always confirm the graphic dimensions before ordering a replacement print. Frame models from different manufacturers use slightly different cassette widths, and a mismatched graphic will not retract cleanly.

What banner stand options exist and how do you choose?
Banner stand types include retractable, telescopic, X-frame, and outdoor stands, each built for different conditions. Choosing the wrong type for your venue creates real problems: an outdoor stand indoors looks bulky, and a lightweight indoor stand outdoors tips over in any breeze.
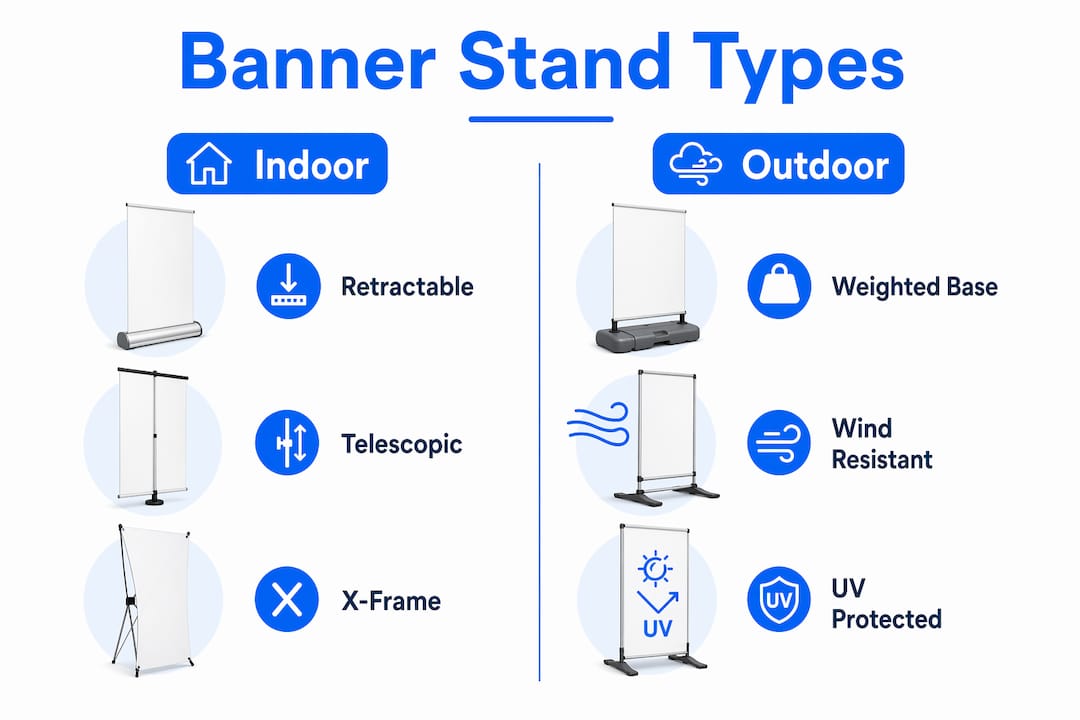
| Stand type | Best use case | Key advantage |
|---|---|---|
| Retractable (roll-up) | Indoor trade shows, conferences | Fast setup, graphic stores inside base |
| Telescopic | Retail, lobby displays | Adjustable height, easy graphic swap |
| X-frame | Budget events, short-term use | Lightweight, low cost |
| Outdoor weighted base | Festivals, outdoor activations | Wind resistance, UV-rated graphics |
Size is the second decision after type. Standard retractable stands run 33 inches wide by 79 inches tall. Wider formats at 47 or 60 inches give you more graphic real estate for complex layouts or multi-panel designs. For a full booth setup, pairing a banner stand with a tension fabric booth kit creates a cohesive branded environment rather than a single focal point.
Key selection factors for event planners:
- Frequency of travel. If the kit ships to multiple cities per month, invest in a reinforced aluminum frame with a padded hard case.
- Venue type. Indoor venues with controlled lighting favor fabric graphics. Outdoor venues need UV-resistant vinyl and weighted bases.
- Branding goals. A single retractable stand works for a small booth. Larger exhibits benefit from double-sided banner stands that display graphics on both faces.
- Budget. X-frame kits cost less upfront but wear faster under heavy use. Retractable aluminum kits cost more and last significantly longer.
Outdoor stands deserve special attention. They feature weighted bases, wind-resistant frames, and UV-protected graphics. These are not optional upgrades for outdoor use. They are the minimum standard for any display that will face direct sun or open air.
How to properly set up a banner stand kit at events
Correct setup protects the hardware and keeps your display looking professional throughout the event. Proper setup prevents damage and enhances brand presentation at every show. A crooked or wrinkled banner signals poor preparation to every visitor who walks past.
Follow these steps for a clean, stable setup:
- Unpack on a flat surface. Lay the carrying case flat before opening. Pulling components out at an angle can bend the pole sections.
- Place the base on level ground. Check that all four feet sit flush. An uneven base causes the stand to lean, which stresses the retraction mechanism over time.
- Extend the support pole. Connect pole sections firmly. A loose connection causes the graphic to sag at the top.
- Pull the graphic up slowly. Retractable stands use spring-loaded rollers inside the base. Pulling too fast or at an angle damages the spring mechanism. Keep the graphic vertical as you extend it.
- Attach the pole to the graphic top bar. Clip or hook the pole tip into the graphic’s top rail. Confirm the graphic is taut but not overstretched.
- Check alignment and tension. Step back and verify the graphic hangs straight. Adjust the pole height if the fabric shows horizontal wrinkles.
- Position for visibility. Place the stand where foot traffic approaches from the front. Avoid placing it directly under harsh overhead lights that create glare on vinyl graphics.
Pro Tip: Pack a small event toolkit alongside your banner stand kit. Include a microfiber cloth for fingerprints, a spare clip set, a small screwdriver, and a clip-on LED light. Trade show lighting often requires supplemental lighting for optimal banner visibility, and a clip-on light costs almost nothing compared to a poorly lit display.
After the event, retract the graphic slowly and store it in the carrying case before moving the stand. Graphic panels stored loosely in transit develop creases that do not fully relax before the next show.
What quality features distinguish the best banner stand kits?
Premium and budget kits look similar in product photos. The difference shows up after the third or fourth event. Budget banner stands tend to wear or tip over during frequent travel, while premium stands maintain stability across dozens of events. That gap in durability directly affects your brand presentation.
Quality indicators to evaluate before purchasing:
- Frame material. Aluminum frames are lighter and more durable than steel or plastic. Look for anodized aluminum, which resists corrosion during outdoor use.
- Spring tension mechanism. The retraction spring should feel smooth and consistent. A jerky or stiff spring indicates a low-grade mechanism that will fail under regular use.
- Locking pole joints. Each pole section should click and lock firmly. Friction-fit connections loosen over time and cause the display to droop mid-event.
- Graphic resolution. Fabric banners require 300 DPI or higher for crisp output, while vinyl banners typically print at 720 DPI for vibrant color. Ordering below these thresholds produces visible pixelation at close viewing distances.
- Curl resistance. High-quality graphic substrates lie flat after unrolling. Low-grade materials curl at the edges, creating gaps between the graphic and the frame.
“Not all banner stands are equivalent. A premium investment ensures stability over many events without tipping or wear.” — Banner Stand Buying Guide
The quality of frame materials, spring tension, and locking mechanisms determines how many events a kit survives before needing replacement. For event planners running six or more shows per year, a premium kit pays for itself by avoiding mid-event failures and replacement costs.
Key Takeaways
A banner stand kit is a complete portable display system, and choosing the right type, material, and quality level determines how well it performs across repeated events.
| Point | Details |
|---|---|
| Kit definition | A banner stand kit includes the frame, printed graphic, pole, carrying case, and attachment hardware. |
| Graphic material choice | Vinyl suits bold color displays; fabric suits text-heavy designs and low-glare environments. |
| Stand type selection | Match the stand type to venue conditions: retractable for indoor shows, weighted bases for outdoor events. |
| Setup discipline | Pull the graphic slowly and vertically to protect the spring-loaded roller mechanism inside the base. |
| Quality investment | Premium aluminum frames with locking pole joints outlast budget kits across frequent event schedules. |
What I have learned from years of banner stand setups
The most common mistake event planners make is treating the banner stand kit as a one-time purchase decision. They buy a budget kit for the first event, it performs adequately, and then it fails publicly at the third or fourth show. The spring mechanism gives out, the pole joint loosens, or the graphic develops a permanent curl that no amount of smoothing fixes. That failure happens in front of exactly the audience you spent money to impress.
The second thing most planners overlook is lighting. Most event planners skip a comprehensive toolkit that includes cleaning cloths and supplemental lighting. Trade show halls use overhead fluorescent or LED grids that create flat, unflattering light on banner graphics. A single clip-on LED light aimed at your banner from above changes the entire visual impact. It costs almost nothing and takes thirty seconds to attach.
Placement matters as much as the display itself. A banner stand positioned at the back wall of a 10x10 booth gets seen only by people who enter the booth. The same stand placed at the front corner of the booth gets seen by everyone walking the aisle. That single positioning decision multiplies your graphic’s exposure without any additional cost.
My honest recommendation: buy the best aluminum retractable kit your budget allows, pair it with a fabric graphic printed at 300 DPI or higher, and carry a small maintenance kit to every event. The booth kit components guide from Printdrill covers the full picture of what a professional event setup requires. The planners who treat their display hardware as a long-term asset consistently outperform those who treat it as a disposable expense.
Printdrill custom banner and display solutions
Printdrill produces custom banner stand graphics, fabric banners, and complete trade show display kits for event planners and marketing professionals across the United States. Every product ships with commercial-grade materials and free design assistance for customers who need help preparing print-ready artwork.
For event planners building out a full booth, Printdrill’s custom fabric banners deliver wrinkle-resistant, matte-finish graphics that pair cleanly with retractable and telescopic frames. Outdoor events benefit from custom mesh banners built for wind resistance and UV exposure. For larger exhibit footprints, the 10x20 trade show booth kit combines tension fabric displays, stands, and accessories into one complete package. Fast nationwide shipping and digital proof approval keep your timeline on track before every show.
FAQ
What is a banner stand kit?
A banner stand kit is a complete portable display package that includes a stand frame, a printed graphic, a support pole, a carrying case, and attachment hardware. It gives event planners everything needed to create a professional branded display at trade shows and exhibitions.
What are the main types of banner stands?
The main types are retractable (roll-up), telescopic, X-frame, and outdoor weighted-base stands. Retractable stands are the most common choice for indoor trade shows because of their fast setup and built-in graphic storage.
How do you set up a retractable banner stand?
Place the base on level ground, extend and connect the support pole sections, then pull the graphic upward slowly and attach the pole tip to the graphic’s top rail. Keep the graphic vertical during extension to protect the spring-loaded roller inside the base.
What graphic material works best for banner stands?
Vinyl works best for bold color graphics in standard lighting. Fabric is better for text-heavy designs or well-lit venues because its matte finish eliminates glare. Fabric graphics require 300 DPI or higher resolution for sharp output.
How long does a banner stand kit last?
A premium aluminum retractable kit used at regular events lasts significantly longer than a budget plastic or steel frame. The spring mechanism, locking pole joints, and frame material quality are the primary factors that determine lifespan under frequent travel and setup cycles.
