
Trade Show Booth Kit Components: A Practical Guide
TL;DR:
- Trade show booth components include modular frames, graphic panels, lighting, counters, and shipping cases. Selecting high-quality aluminum frames, SEG fabric graphics, and proper shipping cases improves durability, appearance, and transport safety. Proper planning and investment in these core elements create an effective and efficient trade show presence.
Trade show booth kit components are the individual structural, graphic, lighting, and furniture elements that combine to create a functional, branded exhibit space at conferences and expos. Getting these components right determines whether your booth attracts foot traffic or gets ignored. For marketing professionals and event coordinators at small to mid-sized businesses, understanding each component before you buy saves money, reduces setup stress, and produces a stronger brand presence. This guide covers every core element, from modular aluminum frames and SEG fabric graphics to LED lightboxes and shipping cases.
1. What are modular frames and why are they vital?
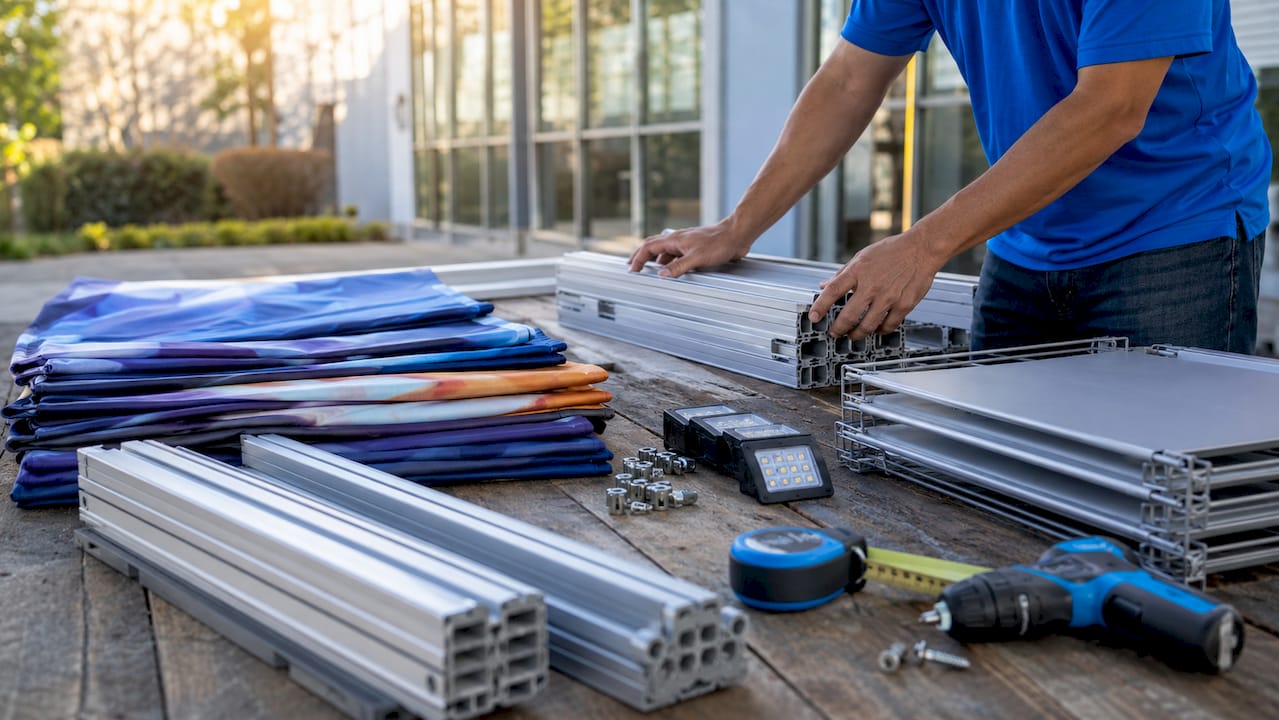
Modular frames are the structural backbone of any trade show booth kit. They define the booth’s shape, support graphic panels, and anchor every other component in place. Without a solid frame, nothing else functions correctly.
Lightweight aluminum frames are the industry standard for good reason. They offer the strength needed to hold large graphic panels while keeping the total shipping weight manageable. A 10x20 modular exhibit, for example, uses aluminum framing with tool-free assembly so one or two people can set up the entire structure without hiring labor.
Key benefits of modular aluminum frames include:
- Adaptability: Frames reconfigure to fit 10x10, 10x15, or 10x20 booth spaces without buying new hardware.
- Tool-free assembly: Most modern systems use push-button or twist-lock connectors.
- Graphic compatibility: Frames accept SEG fabric graphics, tension fabric panels, and backlit graphic inserts.
- Reusability: Quality aluminum frames survive dozens of event cycles without warping or weakening.
Pro Tip: Choose frames rated for your largest planned booth size. Buying a 10x10 frame and later needing a 10x20 means purchasing an entirely new system. Sizing up once costs less than replacing twice.
Selecting high-quality modular components like aluminum frames increases booth durability and enhances brand presentation, which matters most for businesses that exhibit at multiple events per year.
2. How do graphic panels enhance brand visibility?
Graphic panels are the visual face of your exhibit. They carry your logo, messaging, and product imagery across the entire booth surface. The quality and type of panel you choose directly affects how professional your brand looks from 30 feet away.
The three main panel types each serve a different purpose:
| Panel Type | Best Use | Key Advantage |
|---|---|---|
| SEG fabric graphics | Full-wall branding | Wrinkle-resistant, vibrant color |
| Vinyl prints | Budget or temporary displays | Low cost, wide format |
| Backlit graphics | High-impact feature walls | Illuminated, premium appearance |
SEG fabric graphics use a silicone edge that presses into a channel on the frame, creating a taut, seamless surface with no visible hardware. This finish looks polished and photographs well for post-event marketing. Vinyl prints cost less but can show creases after repeated packing and unpacking. Backlit graphics require a lightbox frame but produce the most attention-grabbing result on a crowded show floor.
Placement strategy matters as much as print quality. Position your primary brand message at eye level on the back wall. Use side panels for product details or secondary messaging. Reserve overhead or top-rail space for your logo, which remains visible even when the booth is crowded with visitors.
Pro Tip: Order graphic panels with 0.5-inch bleed on all sides. This prevents white edges from showing if the fabric shifts slightly during installation.
3. What lighting components are essential for an engaging booth?
Lighting is the single most underestimated exhibit booth component. A well-lit booth draws attention from across the hall. A dark booth, even with excellent graphics, blends into the background.
LED lightboxes and adjustable arm lights are the two workhorses of trade show lighting. LED lightboxes backlight graphic panels to create a glowing, high-contrast display that stands out under the flat overhead lighting typical of convention centers. Adjustable arm lights mount to the frame and direct focused beams onto product displays, counters, or specific graphic areas.
Core lighting components to include in your kit:
- LED lightbox frames: Integrate directly with SEG graphic panels for backlit displays.
- Adjustable arm spotlights: Clip or bolt to frame uprights for targeted illumination.
- Power distribution strips: Route power cleanly through the frame to avoid visible cords.
- Dimmer controls: Allow brightness adjustment based on ambient hall lighting.
Pro Tip: Test your lighting setup at home before the event. Convention center outlets are not always where you expect them. Bring a 25-foot extension cord rated for the combined wattage of all your lights.
Power planning is non-negotiable. Most venues charge for electricity by the amp. Knowing your total wattage before you arrive prevents surprise fees and tripped breakers during peak show hours.
4. Why counters, shelving, and display racks matter
Counters and shelving are functional trade show setup items that most exhibitors undervalue until they are standing at their booth with nowhere to put brochures, products, or a laptop. These components control visitor flow and give your team a professional workspace.
Counters with built-in shelving serve three roles at once: they provide a surface for visitor interaction, store promotional materials out of sight, and act as a physical boundary that guides traffic into the booth rather than past it. A counter placed at the booth entrance creates a natural stopping point for passing attendees.
Shelving and display racks organize product samples and literature so visitors can browse without needing staff assistance. This is especially useful during peak traffic periods when your team cannot speak with every visitor simultaneously. Racks also keep the booth floor clear, which makes the space feel larger and more professional.
Material and weight capacity matter when selecting these components. Lightweight aluminum or steel shelving rated for at least 50 pounds per shelf handles most product display needs. Avoid particle board or plastic shelving that flexes under load. A display counter kit with a branded table cover adds a finished, cohesive look that reinforces your brand at the point of contact.
5. How to package and ship trade show booth components effectively
Trade show exhibits have unique shipping requirements based on their materials and components. Flat-pack aluminum frames, large graphic panels, LED lightboxes, and acrylic elements each need different protection during transit. A single damaged LED panel can cost more to replace than the shipping upgrade that would have prevented the damage.
The most reliable approach uses custom reusable flight cases with foam inserts. Custom foam-insert cases protect fragile components like LED panels and monitor mounts through repeated shipping cycles. APG Packaging, for example, designs foam inserts with labeled pockets and orientation indicators so staff can pack correctly under time pressure at the end of a show.
Follow this sequence when preparing your booth for shipping:
- Photograph the fully assembled booth before breakdown so you have a reference for the next setup.
- Disassemble components in reverse assembly order and place each piece in its designated foam pocket.
- Label every case with contents, destination, and assembly sequence number.
- Weigh and measure each case before booking freight to avoid carrier surcharges.
- Book freight at least two weeks before the event. Early shipping planning reduces freight costs and lowers the risk of damage to custom booth components.
“Planning logistics far in advance and tailoring packaging to booth components significantly reduces setup headaches and potential damage costs.” — Legacy TSI
Packaging designed for repeated shipping must be durable, intuitive to pack, and protective of fragile components. Reusable cases pay for themselves after three to four events compared to buying replacement components damaged in transit.
6. How to compare trade show display packages before buying
Trade show booth kits comparison comes down to four variables: included components, booth footprint, graphic quality, and total shipped weight. Buying a kit that looks complete on paper but ships without lighting or a counter forces you to source those items separately, often at higher cost and with mismatched aesthetics.
When evaluating trade show display packages, check these specifics:
- Footprint options: Does the kit come in 10x10, 10x15, and 10x20 configurations, or only one size?
- Graphic inclusion: Are SEG fabric graphics printed and included, or sold separately?
- Lighting: Does the kit include LED lightboxes, or do you need to add them?
- Furniture: Is a counter or shelving unit part of the package?
- Case and carry: Does the kit ship in reusable cases, or do you need to source your own?
A 10x20 booth with display racks suits businesses that need to show multiple product lines. A 10x10 brand-focused kit works better for single-product or service-focused exhibitors who need a tight, high-impact footprint. Matching the kit to your actual show floor allocation prevents paying for space you cannot fill effectively.
Pro Tip: Request a full component list and total shipping weight from any vendor before purchasing. A kit that weighs 400 pounds ships at a very different cost than one that weighs 150 pounds, and that difference compounds across a full event calendar.
Key takeaways
A complete trade show booth kit requires modular frames, graphic panels, lighting, counters, shelving, and purpose-built shipping cases working together to deliver brand presence, visitor engagement, and transport durability.
| Point | Details |
|---|---|
| Modular frames first | Choose aluminum frames sized for your largest planned booth before buying any other component. |
| SEG graphics outperform vinyl | SEG fabric panels stay wrinkle-free and look more professional across repeated events. |
| Lighting drives foot traffic | LED lightboxes and adjustable arm lights make a booth visible from across a crowded hall. |
| Counters control visitor flow | A counter at the booth entrance creates a natural stopping point and workspace for your team. |
| Ship early, ship smart | Book freight at least two weeks out and use foam-insert cases to protect fragile components. |
What I have learned after years of trade show booth planning
The biggest mistake I see marketing teams make is treating the booth kit as a one-time purchase decision. They buy the cheapest modular system available, discover it does not reconfigure for different booth sizes, and end up buying a second system within two years. The total cost of that approach is always higher than buying quality components once.
The second pattern I see constantly is underinvesting in lighting. Teams spend thousands on custom SEG fabric graphics and then display them under flat convention center overhead lighting that washes out the colors. Adding even two LED lightboxes transforms the same graphic into something that stops people mid-stride. The graphic did not change. The light did.
Shipping is where the most preventable losses happen. I have watched exhibitors pack precision-printed backlit panels in cardboard boxes with packing peanuts and then wonder why the panels arrive cracked. Custom foam-insert cases are not a luxury. They are the cheapest insurance you can buy for components that cost hundreds or thousands of dollars each.
My practical recommendation: build your kit around a quality aluminum modular frame, invest in SEG fabric graphics and at least one LED lightbox, add a counter with storage, and spend the money on proper reusable shipping cases from the start. That combination handles 90% of trade show scenarios and ships efficiently. Everything else is optional until you have a specific need for it.
— Printdrill
Build your next booth with Printdrill
Printdrill offers a full range of trade show booth kits and individual exhibit components built for marketing teams that need professional results without overspending. From custom fabric banners to complete tension fabric booth systems, every product ships nationwide with fast turnaround options.
The 10x20 tension fabric booth kit with display racks includes graphic panels, structural framing, and shelving in one package, ready to customize with your brand artwork. Printdrill’s free design assistance means you can submit your logo and messaging and receive a digital proof before production begins. Browse the full catalog at printdrill.com to find the kit size and configuration that fits your next event.
FAQ
What are the core components of a trade show booth kit?
A trade show booth kit includes modular frames, graphic panels, lighting, counters or shelving, and shipping cases. These elements work together to create a functional, branded exhibit space.
What is the difference between SEG graphics and vinyl panels?
SEG fabric graphics use a silicone edge to create a taut, wrinkle-free surface on modular frames, while vinyl panels are lower cost but prone to creasing after repeated packing. SEG graphics produce a more professional finish for repeat exhibitors.
How should I ship fragile trade show booth components?
Use custom foam-insert cases sized for each component. Early logistics planning and reusable flight cases protect fragile items like LED panels and acrylic graphics through multiple shipping cycles.
How do I choose between a 10x10 and a 10x20 booth kit?
A 10x10 kit suits single-product or service-focused exhibitors. A 10x20 kit works for businesses displaying multiple product lines or needing more visitor interaction space. Match the kit size to your actual show floor allocation.
Do LED lightboxes require special power at trade show venues?
LED lightboxes run on standard power but require advance planning for outlet location and total wattage. Most venues charge for electricity by the amp, so calculate your full lighting load before the event and bring extension cords rated for that wattage.
Recommended
- Trade Show Booth Checklist: 2026 Planning Guide – PRINTDRILL
- Trade Show Display Kit - Basic | Affordable Event Marketing Solution – PRINTDRILL
- 10x20 Custom Tension Fabric Trade Show Booth Kit - Display with Racks – PRINTDRILL
- 10x10 Modular Tension Fabric Trade Show Booth Kit - Command Booth – PRINTDRILL
