
How to Produce Step and Repeat Backdrop Clients Love
TL;DR:
- A step and repeat backdrop displays logos in a grid pattern behind event subjects to maximize brand exposure. Proper material selection, artwork preparation, and a clear workflow prevent errors and ensure high-quality results. Validating repeat patterns with a tiled preview reduces misalignments and improves client satisfaction.
A step and repeat backdrop is a large printed display featuring logos or brand marks repeated in a uniform grid pattern, placed behind event subjects to maximize brand exposure in every photo and video. Event planners and marketing professionals who know how to produce step and repeat backdrop clients approve on the first round win more repeat business and command higher project fees. This guide covers material selection, artwork preparation, production workflows, and common pitfalls, drawing on 2026 textile printing standards and tools like Adobe Illustrator, Photoshop, and Printdrill’s custom step and repeat banners. Master these steps and your clients will see the difference at every trade show, corporate event, and promotional appearance.
What materials and tools do you need for high-quality backdrops?
The right material determines whether a backdrop looks polished on camera or distracts from the brand. Step and repeat backdrops are designed to display multiple logos repeated in a pattern, and wrinkle-resistant fabric with portable frames enhances their practicality across venues. Fabric, vinyl, and mesh each serve different event types and budgets.
Fabric backdrops, typically made from polyester, are the top choice for indoor corporate events and trade shows. They are lightweight, packable, and photograph cleanly under studio or event lighting. Vinyl is heavier but more durable for outdoor use, while mesh allows airflow and works well in open-air settings.
For artwork preparation, Adobe Illustrator handles vector logos without quality loss at large scale. Adobe Photoshop manages raster elements and color correction. Both tools are standard in professional backdrop design services workflows.
Eco-solvent and dye-sublimation printing are the leading technologies for durable, vibrant step and repeat backdrops. Eco-solvent delivers outdoor durability, while dye-sublimation produces vivid colors on polyester fabrics. Choosing the wrong technology for the substrate wastes budget and produces inferior results.
| Material | Weight | Durability | Best Use Case |
|---|---|---|---|
| Polyester fabric | Light | Medium | Indoor events, trade shows |
| Vinyl | Heavy | High | Outdoor events, long-term use |
| Mesh | Medium | Medium | Open-air venues, windy conditions |
| Stretch fabric | Light | Medium | Tension frame displays, pop-up booths |
Pro Tip: Select wrinkle-resistant polyester fabric for clients who travel frequently between venues. It packs into a carry bag, sets up in minutes, and photographs without visible creases.
How do you prepare artwork for seamless step and repeat banner production?
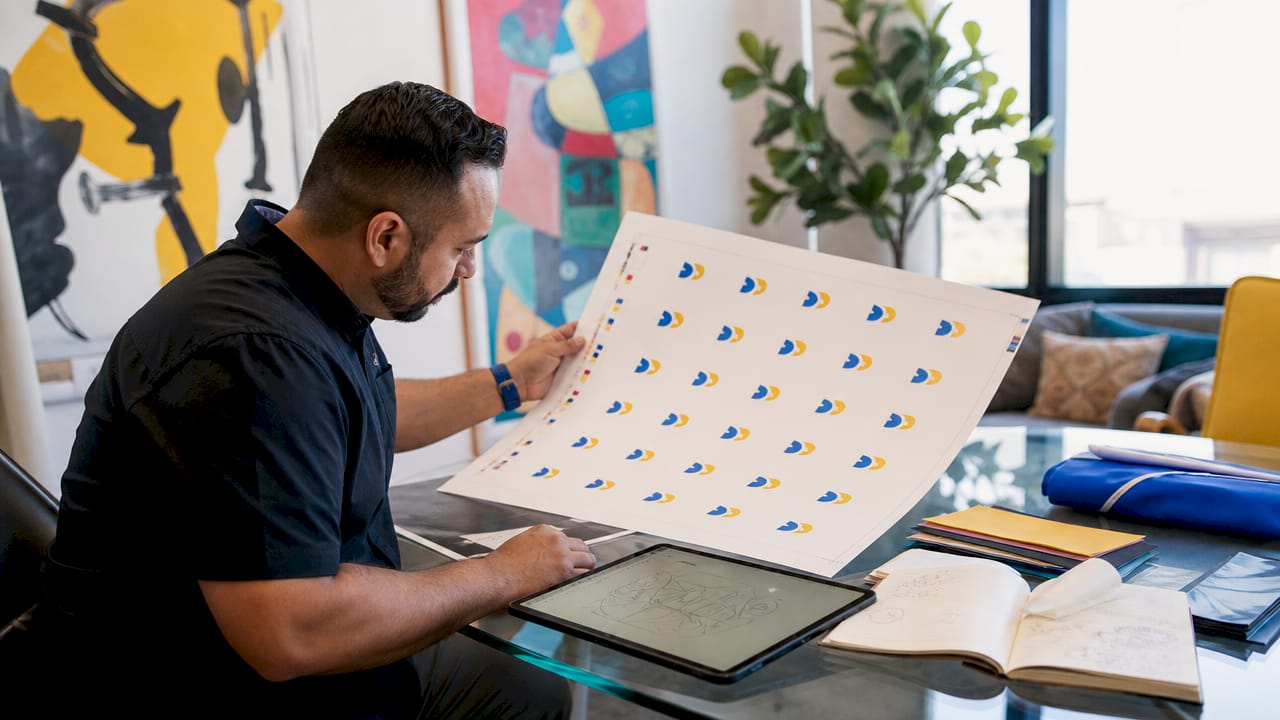
Artwork preparation is where most backdrop projects fail or succeed. A seamless repeat pattern means each tile connects to its neighbors without visible breaks, color shifts, or misaligned logos. Misalignments around 10 cm can cause visible stripes on meter-scale fabric, which destroys the professional look clients expect.
Follow these steps to build production-ready artwork:
- Set up the document. Open Adobe Illustrator or Photoshop. Set the canvas to the final backdrop size, typically 8 ft x 8 ft or 10 ft x 8 ft. Use a color profile of CMYK for print output.
- Place logos at final size. Import vector logos at 100% of their intended print size. Never scale raster logos up after placement.
- Build the repeat grid. Arrange logos in a uniform grid, spacing them evenly both horizontally and vertically. A standard step and repeat uses two alternating rows, offset by half a logo width.
- Create a 3×3 grid preview. Textile printing experts recommend validating artwork with a 3×3 grid preview at final size to catch seam breaks before sending to print. Tile the artwork nine times and zoom out to check for visible stripes or pattern interruptions.
- Check pixel continuity. Use seam energy measurement tools to assess pixel-level continuity across repeat tiles. This step catches errors invisible at normal zoom levels.
- Set resolution and bleed. Export at 150 dpi minimum for large-format fabric printing. Fabric backdrops require 10–15 mm bleed for banners and soft signage to prevent white edges after cutting.
- Export the final file. Save as a print-ready PDF or high-resolution TIFF. Confirm color profiles are embedded before sending to the printer.
Pro Tip: Request a proof print at full scale before approving the final production run. A small test print at 25% scale will not reveal the stripe effect that appears on a full 8 ft backdrop.
Repeat-pattern artwork failure risk drops significantly when you request a tiled preview before printing. Marketing teams frequently skip this step and pay for reprints.
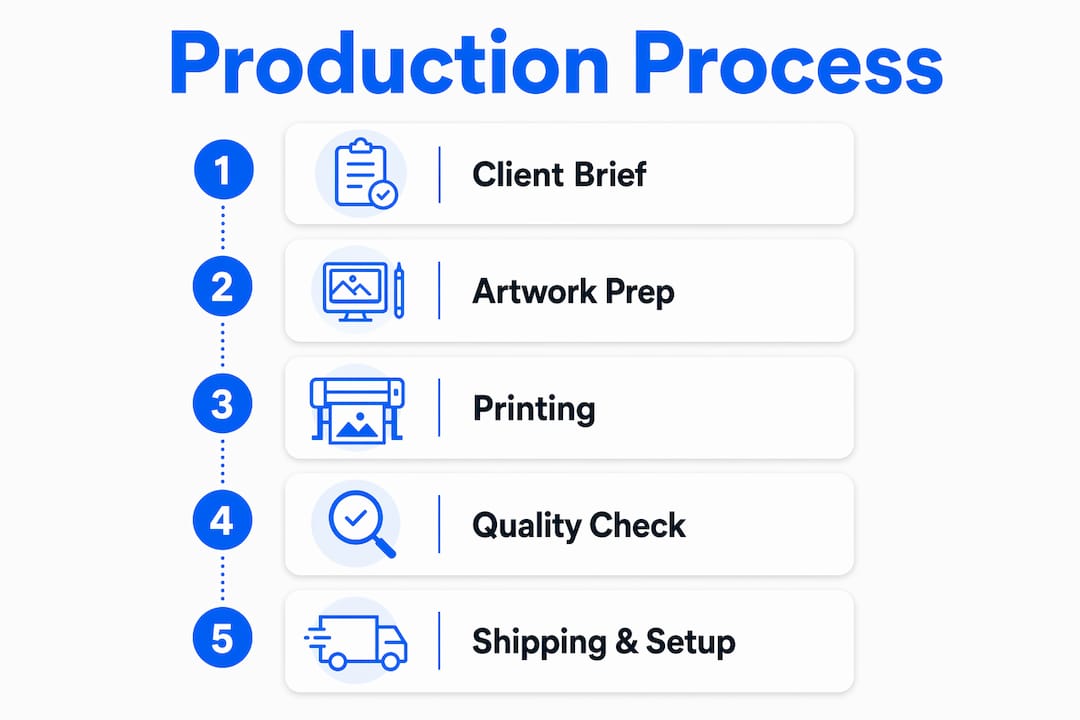
What does the step-by-step production and ordering process look like?
A clear production process protects both you and your client. Coordination between graphic designers and printers is required to ensure pattern tiles align and colors match client brand standards. Skipping any touchpoint risks costly misprints and client dissatisfaction.
Key client touchpoints in the production workflow:
- Initial briefing: Confirm event date, backdrop size, logo files, and brand color codes
- Artwork approval: Send a digital proof showing the tiled repeat pattern for client sign-off
- Material confirmation: Agree on fabric type, frame style, and finishing options
- Production release: Submit print-ready files only after written client approval
- Shipping confirmation: Share tracking details and estimated delivery date
- On-site support: Provide setup instructions or arrange installation assistance
| Stage | Timeline | Responsible Party |
|---|---|---|
| Client briefing | Day 1 | Event planner or account manager |
| Artwork creation | Days 1–3 | Graphic designer |
| Client proof approval | Days 3–4 | Client |
| Print production | Days 4–6 | Print vendor |
| Shipping and delivery | Days 6–8 | Print vendor or courier |
| On-site setup | Event day | Event team |
Production turnaround can be as fast as 24 hours with professional printing services offering standard step and repeat banners. That speed matters most when clients come to you with last-minute event branding needs.
Physical backdrops require setup and steaming on arrival, but they deliver real-time brand impact that digital alternatives cannot replicate when on-site consistency is the priority. Build steaming time into your event-day schedule.
Clients value being able to select backdrop options during booking, minimizing back-and-forth and locking in their choice to avoid scheduling conflicts. Offering a clear selection process at the briefing stage reduces revision cycles and speeds up approval.
What are the most common production challenges and how do you fix them?
Pattern misalignment is the most frequent and costly error in step and repeat banner production. Small gaps or offsets in the repeat grid become obvious stripes when printed at full scale. The fix is always the same: validate the tiled artwork before production, not after.
Common production challenges and their solutions:
- Broken seams: Caused by logos placed without accounting for tile edge bleed. Fix by extending the background color or pattern to the full bleed margin.
- Color inconsistency: Results from mismatched color profiles between the design file and the printer’s RIP software. Always embed the color profile and confirm the printer’s preferred format.
- Low-resolution logos: Client-supplied logos are often web-resolution JPEGs. Request vector files (AI, EPS, or SVG) from the client at the briefing stage.
- Last-minute changes: A logo swap after artwork approval can break the entire repeat grid. Lock artwork files after written client sign-off and charge a revision fee for post-approval changes.
- White edges after cutting: Caused by insufficient bleed. Banners and soft signage require 10–15 mm bleed to finish cleanly.
Pro Tip: For banner bleed, use 10–15 mm. For cut-and-sew garments, use 3–5 mm. Applying garment bleed specs to a backdrop will produce white edges at the trim line.
Using a professional printing service with a proofing workflow catches most of these issues before they reach the client. A fabric pop-up straight display with a pre-approved proof eliminates the most common reprint scenarios entirely.
Key Takeaways
Producing client-ready step and repeat backdrops requires validated repeat artwork, correct bleed settings, and a clear approval workflow before any file goes to print.
| Point | Details |
|---|---|
| Validate artwork with a 3×3 grid | Tile the design nine times at full scale to catch seam breaks before production. |
| Use correct bleed for fabric | Apply 10–15 mm bleed on banners and soft signage to prevent white edges after cutting. |
| Lock files after client approval | Charge revision fees for post-approval changes to protect production timelines. |
| Match printing tech to material | Use dye-sublimation for polyester fabric and eco-solvent for outdoor vinyl applications. |
| Build turnaround time into the brief | Professional vendors can deliver in 24 hours, but proof approval adds 1–2 days minimum. |
What I’ve learned from producing backdrops clients actually keep using
The single biggest mistake I see event planners make is treating the backdrop as an afterthought. They finalize the venue, the catering, and the AV, then call for a backdrop four days before the event. That timeline kills the proofing process. Without a proper proof, you are gambling with the client’s brand at the moment it gets the most camera exposure.
The second lesson is about file quality. Clients almost always send a logo they pulled from their website. A 72 dpi PNG that looks fine on a laptop screen will print as a blurry smear on an 8 ft backdrop. Building a file request checklist into your briefing process, asking for vector files upfront, saves hours of back-and-forth and prevents the most common reprint scenario.
The third thing I’ve found is that clients who see a tiled proof before production almost never request changes after delivery. The proof makes the repeat pattern real to them. They catch their own errors, like a tagline they forgot to include or a logo version that was already retired. That one step, a 3×3 grid preview, turns a potential complaint into a confident approval.
Backdrop design for events is not complicated, but it rewards process discipline. The planners and marketing professionals who build a repeatable production checklist, from briefing to proof to delivery, are the ones clients come back to for every event on the calendar.
— Printdrill
Printdrill’s fabric backdrops for event branding projects
Printdrill offers wrinkle-resistant custom fabric banners built for the exact production workflow described here. Lightweight polyester construction, full-color dye-sublimation printing, and fast nationwide delivery make them a reliable choice for event planners working against tight deadlines.
For planners managing larger exhibit footprints, the 10x20 tension fabric trade show booth kit combines a full backdrop wall with display racks in a single portable package. Free design assistance is available for clients who need help preparing print-ready artwork. Orders ship across the United States with options for expedited production when the event date is close.
FAQ
What is a step and repeat backdrop?
A step and repeat backdrop is a large printed display featuring logos or brand marks arranged in a repeating grid pattern. It is placed behind event subjects so every photo captures consistent brand exposure.
What file format works best for step and repeat artwork?
Vector files in AI or EPS format are the standard for step and repeat banner production. They scale to any size without quality loss, which is critical for large-format fabric printing.
How much bleed do fabric backdrops require?
Fabric backdrops for banners and soft signage require 10–15 mm of bleed. This prevents white edges from appearing at the cut line after finishing.
How fast can a step and repeat backdrop be produced?
Professional printing services can deliver standard step and repeat banners in as little as 24 hours. Factor in 1–2 days for artwork proofing and client approval before placing the production order.
What causes visible stripes on a printed step and repeat backdrop?
Visible stripes result from misaligned repeat tiles in the artwork. Even a 10 cm offset becomes a clear stripe at full backdrop scale. Validating artwork with a 3×3 grid preview at final size before production eliminates this problem.
