
How to Plan Trade Show Booth Layout for Max Impact
TL;DR:
- Effective trade show booth layout planning involves designing aisle flow first to control visitor movement and optimize brand visibility. Starting with venue constraints, correct circulation paths, and strategic zone placement ensures maximum attendee engagement and avoids costly mistakes. Matching physical displays with a well-structured layout enhances exhibitor success and visitor experience.
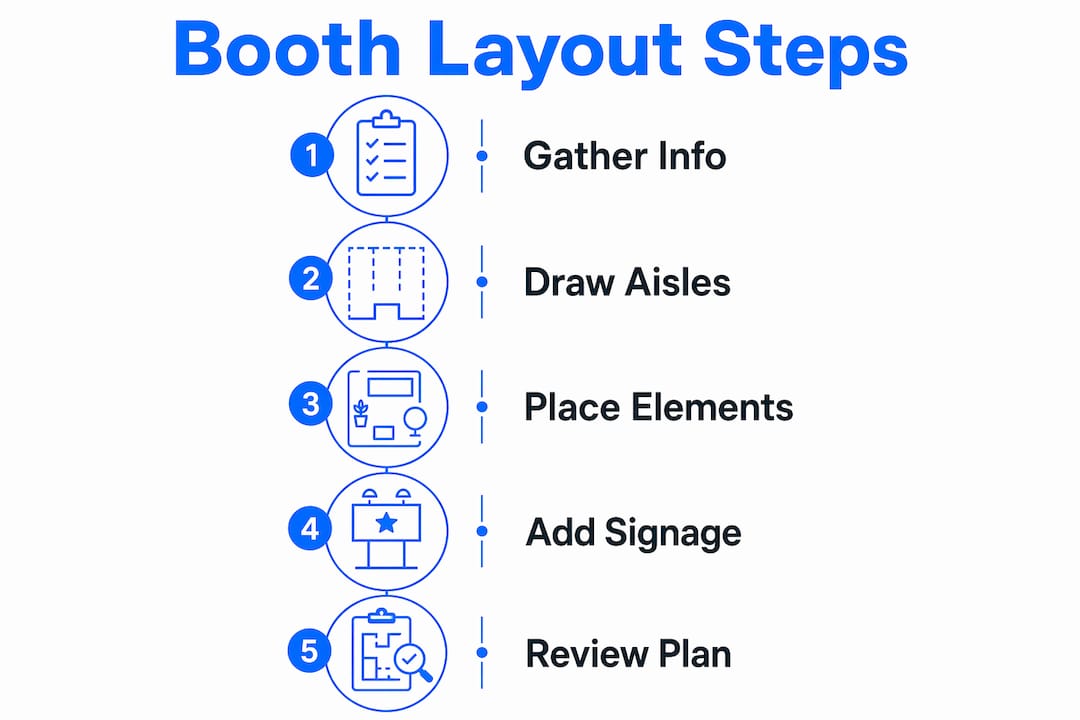
Planning a trade show booth layout is the process of strategically arranging your exhibit space to direct attendee movement, maximize brand visibility, and convert foot traffic into real conversations. Known in the industry as exhibit layout planning, this discipline goes far beyond choosing where to place a table. The decisions you make about circulation, zone placement, and signage directly determine how many attendees stop, engage, and remember your brand. This guide gives you a practical, step-by-step framework built around visitor behavior, not just aesthetics. Use the 2026 planning checklist to stay organized from the start.
What do you need before you plan trade show booth layout?
Preparation is the difference between a layout that works and one that wastes your budget. Before you open SmartDraw, AutoCAD, or any floor plan tool, you need specific information in hand.
The single most important document is the venue’s technical operator plan. This drawing shows column locations, power outlet positions, ceiling heights, and load-bearing restrictions. Getting this plan early prevents unusable booth designs and costly last-minute changes. Venues often release it weeks before move-in, so request it the moment you confirm your registration.
Beyond the technical plan, gather the following before touching any design tool:
- Booth dimensions: Confirm your exact allotted space (10x10, 10x20, or larger) in writing from the event organizer.
- Aisle regulations: Many venues specify minimum aisle widths, typically 8–10 feet, for fire safety compliance.
- Staff count: The number of staff working the booth affects how much open floor space you need to keep clear.
- Branding assets: Finalize your logo files, brand colors, and key messages before designing around them.
- Electrical needs: Know which displays, screens, or lighting rigs require power so you can position them near outlets.
- Neighboring booths: Ask for the floor map showing adjacent exhibitors. A competitor next door changes your visibility strategy.
Once you have this information, tools like SmartDraw or CAD software let you draw to scale and test configurations before committing to physical setup. The table below shows which tools fit different team sizes and budgets.
| Tool | Best for | Cost |
|---|---|---|
| SmartDraw | Small to mid-sized teams needing quick floor plans | Paid subscription |
| AutoCAD | Larger exhibits with complex structural requirements | Paid, professional grade |
| SketchUp Free | 3D visualization for teams with design experience | Free tier available |
| Google Slides / PowerPoint | Basic layout mockups for simple 10x10 booths | Free |
Pro Tip: Request the venue’s technical plan in PDF and DWG formats. The DWG file imports directly into CAD tools and saves hours of manual redrawing.
How do you design circulation paths for maximum visitor traffic?
Circulation design is the foundation of effective exhibit layout planning. The rule most planners get wrong: draw your aisles before you place a single booth. Aisles drawn first prevent congestion and funnel visitors past exhibitors in a predictable, controlled path.
Here is a step-by-step process for mapping circulation and assigning booth placement:
- Overlay the venue technical plan. Import or trace the venue’s column grid, exits, and utility points onto your blank floor plan. These are fixed constraints that every other decision must work around.
- Draw main circulation aisles first. Mark your primary aisles at a minimum of 10 feet wide. Secondary aisles can be 8 feet. Never narrow an aisle to gain booth space. Congested aisles push attendees away from exhibitors entirely.
- Identify high-traffic zones. Entrances, registration desks, food areas, and keynote halls generate the most foot traffic. These zones are your premium real estate.
- Assign premium spots to key sponsors or your flagship booth. High-traffic positions near entrances should go to exhibitors who benefit most from volume exposure, such as lead sponsors or your own primary product line.
- Place lounge and meeting areas away from main aisles. Lounge zones set apart from heavy traffic encourage longer discussions without the noise and interruption of the main floor.
- Mark safety aisles clearly. Fire codes require unobstructed paths to exits. These are non-negotiable and must appear on every version of your floor plan.
The logic behind this sequence is simple. Visitors follow the path of least resistance. If your aisles guide them past your booth naturally, you do not need to rely on aggressive outreach to pull them in.
Pro Tip: Walk the venue in person before finalizing your layout. Entrance doors, escalators, and food courts create invisible traffic magnets that no floor plan fully captures until you stand in the space.

How do you arrange booth elements to engage attendees?
Internal booth arrangement is where visitor behavior shapes design, not the other way around. A booth that looks polished in a render but ignores how people actually move through it will underperform every time.
Organize by traffic heat zones
Divide your booth into three zones based on where visitors are most likely to look first.
- Front zone (high heat): This is the first 2–3 feet of your booth facing the aisle. Place your most attention-grabbing element here: a backlit display, a bold fabric banner, or a product demo station. Organizing zones by traffic heat spots ensures your most important features get seen before visitors move on.
- Middle zone (engagement): This is where conversations happen. Place staff, interactive demos, or product samples here. Keep it open enough for two or three people to stand comfortably without blocking the aisle view.
- Back zone (conversion): Use this area for private meetings, literature racks, or a seated consultation area. Visitors who reach the back zone are already engaged and more likely to convert.
Place signage and lighting with purpose
Well-placed lighting and visible signage increase booth attention and guide visitors through the exhibit. Overhead lighting draws the eye from a distance. Spotlights on products create focal points that stop foot traffic. Signage at eye level (roughly 5–6 feet from the floor) performs better than banners placed too high or too low. For banner sizing guidance specific to booth dimensions, the banner sizing guide for event planners covers standard configurations in detail.
Digital screens work best in the front or middle zone where passing attendees can catch motion graphics without stepping inside the booth. Static displays belong in the back zone where engaged visitors have time to read them.
How do you finalize your booth layout and avoid common mistakes?
The finalization stage is where most small and mid-sized exhibitors lose time and money. The fix is a structured review process before anything gets shipped or built.
Interactive floor plans for exhibitor review reduce errors and keep your design aligned with venue requirements. Share a digital version of your floor plan with your event organizer, your booth vendor, and at least one staff member who will work the show. Each person will catch different problems.
The table below compares the most common layout mistakes against the correct approach.
| Common mistake | Correct approach |
|---|---|
| Drawing booths before aisles | Always draw aisles first to control visitor flow |
| Ignoring column and power point locations | Obtain the venue technical plan before designing |
| Placing all displays at the back | Put your strongest visual element in the front zone |
| Skipping a walkthrough simulation | Test the layout against likely visitor paths before move-in |
| Leaving no buffer for last-minute changes | Build 10–15% of your floor space as flexible or unassigned |
“Design is a tool to shape visitor behavior. Plan around how people move, not just how the booth looks.” — Taksha Global on exhibition stand design
One overlooked step: simulate the visitor pathway on paper. Draw a line from the nearest entrance to your booth and trace where a first-time attendee’s eyes would land. If that line hits a storage cart or a staff table, you have a dead zone that needs fixing before move-in day.
Key Takeaways
Effective exhibit layout planning starts with aisles and venue constraints, not booth aesthetics, and every internal zone must align with how visitors actually move through the space.
| Point | Details |
|---|---|
| Get the venue technical plan first | Column and power point locations must inform your layout before any design work begins. |
| Draw aisles before booth spaces | Aisle design controls visitor flow and prevents congestion across the entire exhibit floor. |
| Use a three-zone booth structure | Front, middle, and back zones should match visitor engagement levels from attention to conversion. |
| Place signage and lighting strategically | Eye-level signage and overhead lighting guide visitors and increase booth visibility from the aisle. |
| Review with an interactive floor plan | Share a digital layout with your vendor and staff before move-in to catch errors early. |
What I’ve learned from watching well-designed booths fail
I’ve seen exhibitors spend significant budgets on tension fabric displays, custom lighting rigs, and premium booth kits, then watch attendees walk past without stopping. The layouts looked great in the render. On the floor, they were dead zones.
The pattern is consistent. The booth was designed around what the brand wanted to show, not around where visitors were already walking. The demo station was in the back. The signage faced the wrong aisle. The staff stood near the storage area because that’s where the table ended up.
What actually works is starting with the venue map, not the product catalog. When you know where the registration desk is, where the food is, and which aisle connects the two, you know exactly where to position your front zone. Everything else follows from that single decision.
I also think exhibitors underestimate how much staff placement matters. Your team is part of the layout. A staff member standing at the front zone edge, facing the aisle, functions like a physical call to action. A staff member seated at the back, looking at a phone, creates a visual dead zone that no amount of signage can fix. Train your team on where to stand and why. It costs nothing and changes results immediately.
The other lesson: build flexibility into your plan. Venues change power outlet locations. Neighboring booths go up differently than the floor map showed. The exhibitor who planned for 10% of their space to be adjustable adapts in 20 minutes. Everyone else scrambles for two hours.
— Printdrill
Build your booth layout with the right display products
A solid layout strategy only delivers results when your physical displays match the plan. Printdrill offers a full range of trade show display products built to fit the zone-based layouts described in this guide. The 10x20 tension fabric booth kit works for mid-sized exhibit spaces where you need a strong back wall and integrated product display areas. For booths that need high-visibility front-zone graphics, custom fabric banners and custom mesh banners are available in custom sizes with fast turnaround. Free design assistance is included with every order, so your graphics align with your floor plan from the start.
FAQ
What is exhibit layout planning?
Exhibit layout planning is the process of arranging booth spaces, aisles, and display elements within a trade show floor to direct visitor movement and maximize brand exposure. It combines venue constraints, traffic flow analysis, and zone-based design.
How wide should trade show aisles be?
Main aisles should be at least 10 feet wide, and secondary aisles should be at least 8 feet wide. Narrower aisles create congestion and reduce the number of attendees who pass your booth comfortably.
What is the biggest mistake in booth layout design?
The most common mistake is placing booth elements before drawing aisles. Aisles must be designed first to control visitor flow. Designing booths first leads to congested paths and poor attendee distribution.
Where should the most important booth element go?
Place your strongest visual element in the front zone, the first 2–3 feet of your booth facing the aisle. This is where first eye contact happens and where you have the best chance of stopping foot traffic.
How do I get promotional products to complement my booth layout?
Pairing your layout with the right trade show promotional products reinforces your brand message at every touchpoint, from giveaways at the front zone to literature at the back.
Recommended
- Trade Show Booth Checklist: 2026 Planning Guide – PRINTDRILL
- 10x20 Curved Tension Fabric Trade Show Booth - 20ft Exhibit Booth – PRINTDRILL
- 10x20 Custom Tension Fabric Trade Show Booth Kit - Display with Racks – PRINTDRILL
- 10x20 Tension Fabric Trade Show Booth Kit - Portable 20 ft Booth – PRINTDRILL
